Saturday, October 19, 2013

Angular JS - Basic Introduction and Example

AngularJS is a javascript framework supported by Google that embraces extending HTML into a more expressive and readable format. It decreases emphasis on directly handling DOM manipulation from the application logic, allowing for easier testing. It employs efficient two-way data binding and sensible MVC implementation, reducing the server load of applications, a new wave of Single Page Applications (SPA). Your application is defined with modules that can depend from one to the others. It also encapsulates the behavior of your application in controllers which are instanciated thanks to dependency injection. Lets start with the well know example in the computure world, Hello World !!!, why can't we change a bit lets say Hello Universe.

Before we can do anything we need to create a simple HTML page in that we can include AngularJS. Create a file called index.html and use the following code: which is just a normal html code, which includes Angular JS Javascript, regular label, textbox and two new items.

 <!DOCTYPE html>  
 <html ng-app>  
 <head>  
   <title>Learning AngularJS - Hello Universe</title>  
   <script type="text/javascript" src="https://ajax.googleapis.com/ajax/libs/angularjs/1.0.7/angular.min.js"></script>  
 </head>  
 <body>     
   Write Your Name in Textbox:  
   <input type="text" ng-model="yourname" />  
   <h1>Hello Universe by : {{ yourname }}</h1>  
 </body>  
 </html>  

First item which strikes our eyes is ng-app, which tells the active portion of he page. The directive ng-app will cause Angular to auto initialize your application.
Nextone is the attribute ng-model in textbox as ng-model="yourname". Whenever Angular sees this directive ng-model it automatically sets up two-way data binding.
How this works? When this page is loaded, Angualar bounds the state of text with model, thus when the user changes the value, model yourname will get's
automatically changed.
And finally, the mysterious expression {{ yourname }}: Which tells Angular to bind the value of model yourname in place of {{ yourname }}.

That's it we have just learned how to say Hello Universe through Angular

Happy Programming ...!!!
Monday, September 23, 2013

Not showing SVN Logs on Zend Studio 10

When i recently moved to Zend Studio 10 from 8, i see wired issue on displaying the SVN Logs. Whenever i commit my changes, Zend Studio 8, used to disply the logs on the SVN Console, but this was not happening in Zend Studio 10. How to resolve that?

You have to enable Console Output manually.

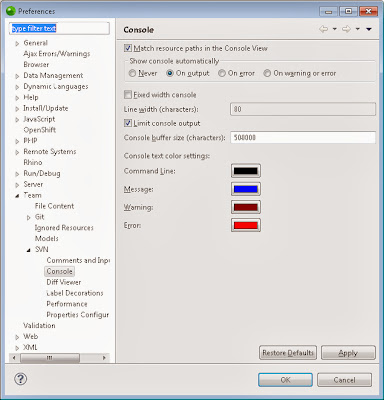
In the menu bar select Window->Preference.

In the Preference selecte Team -> SVN -> Console.

This trigger the Console Popup screen, as shown below. In that you will see options under Show console automatically, you have to select the option On Ouput which will show the SVN logs on the console.


Happy Programming...!!!

Saturday, September 14, 2013

Get Innerhtml by Parsing html DOM with DOMDocument

The domdocument class of PHP is a very handy one which can be used for a number of tasks like parsing xml, html and creating xml. In this tutorial we are going to see how to use this class to parse html content, and get a Innerhtml of a specific div element.

Below is the sample html code, from which we are going to get the innerhtml of the div tag with id=test2.
 <html>  
 <title>Test Content</title>  
 <body>  
 <div id="test1" class="container1">  
   Test content inside div id test1  
 </div>  
 <div id="test2" class="container2">  
   <p>Test content inside div id test2</p>  
 </div>  
 </body>  
 </html>  
Lets construct DOMDocument object and load the html content into it.
 $dom = new DOMDocument('1.0');;   
 $siteUrl = "http://*******";  
 //Fetch the filec content from the url  
 $file = file_get_contents($siteUrl);  
 // load the html into the object  
 $dom->loadHTML($file);   
 // discard white space  
 $dom->preserveWhiteSpace = false;  
Now the $dom object has loaded with the html content, which and can be used to extract contents from the whole html structure. DOMDocument has enough functions to make our work easier to parse and extract the content as needed, some of the common function which will be used frequently are getElementsByTagName and getElementById.

Lets how we can extract the div based on the id. To fetch the div based on id, we need to use the getElementById.

//get element by id
$test1div = $dom->getElementById('test1');

This will return the DOMNode, through which can fetch the text content my accessing $test1div->textcontent; that's simple. But if you want to fetch the innerhtml, you need to iterate your node, and add up all the child elements and display it. Below we have created a new method, which accepts the DOMNode
and iterates through all the childNodes within that, accumulates the data, and saves it as XML string and returns it.

 function getInnerHtml( $node )   
 {  
   $innerHTML= '';  
   $children = $node->childNodes;     
   foreach ($children as $child)  
   {  
     $innerHTML .= $child->ownerDocument->saveXML( $child );  
   }     
   return $innerHTML;  
 }  

That's it, you will get the Innerhtml of the DIV, with the all the html tags inside the div as it is.

Happy Programming...!!!

Sunday, July 28, 2013

How to integrate Spring Security to an existing web application?

Let see how we can integrate a Spring Security to an existing web application. Download the Spring Security from here, from the download add the following jar spring-security-core-3.2.0.M2.jar and spring-security-config-3.2.0.M2.jar from \spring-security-3.2.0.M2\dist, to your project lib folder.

Since this is the existing project, i assume the all the url pattern will be routed through Spring Dispatcher Servlet. Now let's modify our web.xml to add the filter, since spring security uses filter approach, this provides a hook into the Spring Security web infrastructure.


   org.springframework.web.context.ContextLoaderListener               


   contextConfigLocationWEB-INF\applicationContext-security.xml    

   springSecurityFilterChain
   org.springframework.web.filter.DelegatingFilterProxy


   springSecurityFilterChain
   /*


Next we need to create applicationContext-security.xml under WEB-INF


The element http in the applicationContext-security.xml, says that we want all URLs within our application to be secured, requiring the role ROLE_USER to access them. Thus we are forcing to authenticate ourselves when visiting our pages in the site.

Now to add some test users for a rapid development, we have configured two users here ramanujam and user1, with their password and roles using the authentication-provider and user-service. That's all you have integrated a simple security to your web application. Now if you access any of your web pages, you will redirecting to a default spring login pages.

Happy Programming...!!!

Saturday, July 13, 2013

Remot Sort : How to override SortParameters in Ext-Js Grid Panel?

When you sort using the gird, typically clicking on the column header, the dataIndex of the column will be passed as the sort properties, but not always the server will understand the grid name. for example, lets take below example.

Below is the Snap shot of the Activity Model
Ext.define('Activity', {
    extend: 'Ext.data.Model',
    uses: [ActivityType, ActivityStatus]
    fields: [
        {name: 'activityTypeId', type: 'int'},
        {name: 'activityStatusTypeId', type: 'int'},
        {name: 'accountId', type: 'int'},
        {name: 'dueDate', type: 'date', dateFormat: 'm/d/Y'},
    ],
});


The Relevant Java Model for the Activity
public class Activity {
  @ManyToOne(Fetch = FetchType.EAGAR)
  @JoinColumn(name = "activity_type_id")
  private ActivityType activityType;

  @NotNull
  @ManyToOne(Fetch = FetchType.EAGAR)
  @JoinColumn(name = "activity_status_type_id")
  private ActivityStatusType activityStatusType;

  @ManyToOne(Fetch = FetchType.EAGAR)
  @JoinColumn(name = "account_id")
  private Account account;

  @DateTimeFormat(pattern = "MM/dd/yyyy")
  private Date dueDate;
 
}

If you look at the variable names in Java Bean and Ext Model, you can see the difference. So when you are passing the sort parameters to your service call through, it needs to know the exact column name for example, Lets take activityStatusTypeId. If you click on the Column for Sort based on the activityStatsTypeId, the grid will pass on the dataIndex name as the property to the server. If you look at the FireBug console for the parameters, you see like this.

sort [{"property":"activityStatusTypeId", "direction":"DESC"}]

When you pass activityStatusTypeId to the service, really my server doesn't understand what activityStatusTypeId to the activity table. So we need to pass the extact column name as the sort property to make my service understand. To override the default parameters, we need to override getSortParam() in the colum config.

Ext.define('ActivitiesGridPanel', {
    extend: 'Ext.grid.Panel',
    alias: 'widget.activitiesGridPanel,
    initComponent: function() {
       var me = this;
       Ext.applyIf(me, {
         columns:[
           { xtype: 'gridcolum',
             dataIndex: 'activityStatusTypeId',
             text: 'Status',
             getSortParam: function() {
                 return 'activity_status_type_id';
             }
           },
           { xtype: 'datecolumn',
             dataIndex: 'activityStatusTypeId',
             text: 'Due Date'
           },
           { xtype: 'gridcolum',
             dataIndex: 'activityTypeId',
             text: 'Type'
           },
         ]
       }    
    }    
});

After overriding the sortParameter for the column using getSortParam() function, if you click on the column in the gird, instead of passing the dataIndex name, it will sent out the overridden string as the sort parameter. You see the parameter in FirBug

sort [{"property":"activity_status_type_id", "direction":"DESC"}]

Happy Programming ...!!!

Thursday, June 20, 2013

JPA-Hibernate - Inheritance - Mapped Superclass

Most of the time, when we are developing an application we will use the concept called Inheritance, there will be a chance, where we need to abstract out the common properties to a separate class and extend it in our current class. Lets see how we are going to achieve this in hibernate or jpa.

Below is the initial entity (class), before we apply our inheritance, This entity(class) has three columns (properties), let say property id and name will be used
considerably throughout my application, in many entity (class), so lets abstract out the id and name from the Expense (entity) to new class name Base.

@Entity
@Table(name="Expense")
public class Expense 
{
 
 @Id
 @Column(name="ID")
 @GeneratedValue
 private int id;
 
 @NotBlank(message = "Name should not be empty")
 @Column(name="NAME")
 private String name; 

  
 @NotBlank(message = "Amount should not be empty")
 @Column(name="Amount")
 private double amount;
}
Here i have abstracted out id and name from the Expense entity and moved it to a separate class name Base,
and have the Expense entity extends Base, and i have annotated the Base class with @MappedSuperclass, note, the Base class is not an entity.

A class designated as a mapped superclass has no separate table defined for it. Its mapping information
is applied to the entities that inherit from it. An entity may inherit from a superclass that provides persistent entity state and mapping information, but which is not itself an entity. Mapping information can be overridden in such subclasses by using the AttributeOverride and AssociationOverride annotations

@MappedSuperclass
public class Base 
{
 
    @Id
    @Column(name="ID")
    @GeneratedValue
    private int id;
 
    @NotBlank(message = "Name should not be empty")
    @Column(name="NAME")
    private String name;
}


@Entity
@Table(name="Expense")
public class Expense extends Base
{

    @NotBlank(message = "Amount should not be empty")
    @Column(name="Amount")
    private double amount;
}

Happy Programming ...!!!

Wednesday, June 5, 2013

How to create Form Panel and add it to Window in Ext Js

FormPanel provides a standard container for forms. It is essentially a standard Ext.panel.Panel which automatically creates a BasicForm for managing any Ext.form.field.Field objects that are added as descendants of the panel.Creating a form starts with instantiating an object of FormPanel. Like any Ext component, the constructor accepts the configuration of the component you are creating. Now, let’s get our hands dirty with the code.

Below is the basic FormPanel, which just has only the FormPanel, it doesn't contain any Form Fields
var mf = new Ext.FormPanel( {  
 //frame: true,
 title: 'Add Medicine',
 cls: 'my-form-class',
 width: 350,
 height: 350
});

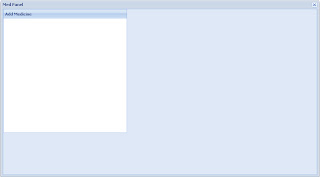
When you add the above code to your window, it will just show a blank panel inside the window like below screen shot

Lets how to add the Panel to the Window. To add the Panel, we need to create Window first. Below is the source code to create an Window and add the Panel to it. Here we have created an Window using new Ext.Window. If you look at the source you can see an attribute called items, which will holds the list of components to be added in the window, here we have added the FormPanel mf to the window. You can add any number of components to the Window. win.show() at the end is to render the window, which makes it visible in the browser.

var win = new Ext.Window(
{
    id:'myWindow',
    title:'Med Panel',
    width:900,
    height:500,
   //layout:'fit',
    items:[mf]
});
win.show();


Now lets how we can add the Form fields to the Form Panel. We can create components using the keyword "new" and the component we need to instantiate, the way above where we have created teh Window and FormPanel, or we can create them through configuration objects using the property "xtype". So for adding a TextField, we have to use "Ext.form.TextField" or using xtype:'textfield'. Lets see how we can add textfields using both mechanism to the Form Panel.

var desc = new Ext.form.TextField({
     name: 'description',
     fieldLabel: 'Description'
     
    });


var mf = new Ext.FormPanel( {  
 //frame: true,
 title: 'Add Medicine',
 cls: 'my-form-class',
 width: 350,
 height: 350,
 items: [
          {
  xtype: 'textfield',
  fieldLabel: 'Medicine Name',
  name: 'name',
  allowBlank : false
   },
          {
         xtype: 'textfield',
         fieldLabel: 'Company',
         name: 'companyName',
         allowBlank : false
          },
   desc
 ]
});

var win = new Ext.Window(
{
    id:'myWindow',
    title:'Med Panel',
    width:900,
    height:500,
   //layout:'fit',
    items:[mf]
});
win.show();

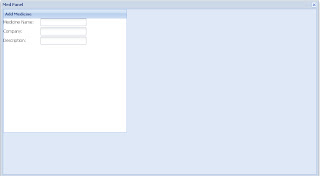
If you look at the above code, we have just added an new property called items to the FormPanel, compared to previous code at the top. Where we have defined two defined textfield using the xtype, and added on textfiled. That's it, you have created the FormPanel and added it to the Window, if you run the above code, you can see the Textfields shown up in the FormPanel, below is the screen shot, how it will look in the browser.


Happy Programming ...!!!

Tuesday, May 28, 2013

First step into Scala Framework

I have been recently moved to a new project, which is using Scala Framework. It seems to be an new word to me first, when i heard about the framework which we are going to use. So i have started digging into deep, to understand the real usage of the framework. So here's my record so I don't forget in future what i have learnt and how i did it.

Scala is a Functional/Object-Oriented and scripting language that exectues on Java Virtual Machine (JVM) and is becoming popular now, especially with the JAVA developers. It cleans up what are often considered to have been poor design decisions in Java (e.g. type erasure, checked exceptions, the non-unified type system) and adds a number of other features designed to allow cleaner, more concise and more expressive code to be written.

You can download Scala from here. If you have downloaded the .msi file, just double click it, it will do everything for you, if you have downloaded the zip file, extract it and put it in a location, and set the environment variable SCALA_HOME point to the bin directory of the scala folder. Once you did the above, just go to the command prompt, and type scala, you will enter into the scala prompt as below.


Once you are in scala prompt just type 8 * 5, your screen should be like this, once you typed just press enter

scala> 8 * 5

it will return res0: Int = 40

res0 is result index 0, Int is the type of output, 40 is the result. Suppose if you want to use the output for further processing, you have to just say

scala> res0 * 2

It will return res1: Int = 80

res1 is result index 1, Int is the type of output, 80 is the result.

Nice one right, seems to that it limits the number of lines we need to code to get the result :)

In the coming weeks, you can see some more examples on Scala, as and then, when i learn new things on this.

Happy programming ...!!!


Friday, May 24, 2013

Spring MVC Form Validation with Annotation using Spring Bean Validation Framework

This tutorial walks you through the step by step instructions in order to support and apply validation example in Spring MVC, using Spring Bean Validation Framework, which is part of the Spring Modules project.

So here's my record so I don't forget in future how I did it.

Make sure that you have downloaded the spring-modules-validation-0.8.jar have it in your classpath.

Spring Modules validation provides a bunch of generic validation out of the box for all the tedious, standard stuff - length validation, mandatory fields, valid e-mail addresses etc (details here). And you can plug this straight into your application by using annotations. How? Easy.

Below is the configuration, you have to do in your servlet xml file, where you are defining your validator.


Below is my simple Entity Model class, which deals with product. Since the Name and Description of the Product is a must while presisting the data, i have added an validation constraint through annotation, here you can see i have added @NotBlank for name and description variables, and also the message to be shown to the users when they left it blank.

public class Product{
 
    @Id
    @Column(name="ID")
    @GeneratedValue
 private int id;
 
 @NotBlank(message = "Name should not be empty")
 @Column(name="NAME")
 private String name;
 
 @NotBlank(message = "Description should not be empty")
 @Column(name="DESCRIPTION")
 private String description;
 
 public int getId() {
  return id;
 }
....

Now the Spring Controller
The Bean Validation Framework includes its own Validator implementation, called BeanValidator, we are injecting this into the controller, and it was autowired through the xml configuration which we did in the top.

On submitting the form, we will be routed to the addExpense method, where will call the validate() method by passing in the form bean (expense) and the BindingResult. If there any errors, we will just return the form view name which will show the error message.

@Controller
public class ExpenseController 
{
 @Autowired
 private ExpenseService expenseService;
 @Autowired
 private ExpenseTypeService expenseTypeService; 
 @Autowired
    private Validator validator;
    
    public void setValidator(Validator validator) {
        this.validator = validator;
    }
 
 @RequestMapping("/expenselist")
 public String expenselist(Map map, @ModelAttribute("ExpenseName") String expenseName)
 {
  List expenseTypeList = expenseTypeService.fetchAll();
  
  map.put("expense", new Expense()); 
  map.put("expenseTypeList", expenseTypeList);
  map.put("expenseList", expenseService.fetchAll()); 
  map.put("expenseName", expenseName);
  return "expenselist";
 }
 
 @RequestMapping(value="/addexpense", method=RequestMethod.POST)
 public String addExpense(@ModelAttribute("expense") 
   Expense expense, BindingResult result, RedirectAttributes redirectAttrs)
 {
  validator.validate(expense, result);
  if (result.hasErrors()) { return "expenselist"; }
  
  //System.out.println(expense.getExpenseTypeId());
  System.out.println(expense.getName());
  expenseService.add(expense);
  redirectAttrs.addFlashAttribute("ExpenseName", expense.getName());
  return "redirect:/expenselist.html";
 }
}

Suppose if you are not Injecting the Validator, you can just initilize the valiator as shown below in the controller, rest are same as above
public class ExpenseController 
{
 @Autowired
 private ExpenseService expenseService;
 @Autowired
 private ExpenseTypeService expenseTypeService;

        private BeanValidator beanValidator = new BeanValidator(new AnnotationBeanValidationConfigurationLoader());

}

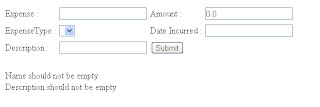
Below is the screen shot, with the error message shown, when the form is submitted.


The tag form:errors will help us to show the error message to the users

Expense :


Amount :


ExpenseType :


Date Incurred :


Description :


Happy programming.

Saturday, May 11, 2013

Spring MVC - FlashAttributes

One of the common problem in a web based application, involving form submission is mutilple form submission, re-entering submitting the form on browser refresh, pop-up alert asking for re-submission of the form, if we press the back button. To overcome the above problem, we will be doing a redirect after a form submission instead of the forward. Doing a redirect causes the browser to do a new GET request and load the page, and provides a solution to the above mentioned problem, but comes with one serious problem, where we will be missing the vital data of request parameters and attributes.

To overcome this problem, Spring MVC comes with FlasAttributes. Flash attributes provide a way for one request to store attributes intended for use in another. This is most commonly needed when redirecting — for example, the Post/Redirect/Get pattern. Flash attributes are saved temporarily before the redirect (typically in the session) to be made available to the request after the redirect and removed immediately.

Spring MVC has two main abstractions in support of flash attributes. FlashMap is used to hold flash attributes while FlashMapManager is used to store, retrieve, and manage FlashMap instances.

Flash attribute support is always "on" and does not need to enabled explicitly although if not used, it never causes HTTP session creation. On each request there is an "input" FlashMap with attributes passed from a previous request (if any) and an "output" FlashMap with attributes to save for a subsequent request. Both FlashMap instances are accessible from anywhere in Spring MVC through static methods in RequestContextUtils.

Here in the below sample code, we are adding the expense details to the DB and redirecting back to the form, with the message saying the following expense have been added to the list.


Flash attributes added via RedirectAttributes are automatically propagated to the "output" FlashMap. Here we have added RedirectAttributes redirectAttrs to your Spring controller’s method addExpense. The addFlashAttribute method automatically add the given parameter to the output flash map and pass it to the subsequent requests.

Before your handler method will be called, Spring Framework will populate the Model with the available Flash Attributes – at this point value passed from addExpense will become a model attribute for the expenselist method, and the same can be added to the map, to return it to the presentation layer, to get it displayed. Here the from the redirect,it comes to the expenselist method, where it will reach as a ModelAttribute and the same have been defined in the method signature with the respective type.

@RequestMapping("/expenselist")
public String expenselist(Map map, @ModelAttribute("ExpenseName") String expenseName)
{
 List expenseTypeList = expenseTypeService.fetchAll();
 
 map.put("expense", new Expense()); 
 map.put("expenseTypeList", expenseTypeList);
 map.put("expenseList", expenseService.fetchAll()); 
 map.put("expenseName", expenseName);
 return "expenselist";
}

@RequestMapping(value="/addexpense", method=RequestMethod.POST)
public String addExpense(@ModelAttribute("expense") 
  Expense expense, BindingResult result, RedirectAttributes redirectAttrs)
{
 //System.out.println(expense.getExpenseTypeId());
 //System.out.println(expense.getName());
 expenseService.add(expense);
 redirectAttrs.addFlashAttribute("ExpenseName", expense.getName());
 return "redirect:/expenselist.html";
}

Happy Programming...!!!

Saturday, May 4, 2013

Integrate ExtJs DataGrid with Spring MVC

Sencha ExtJs is one of the rapidly growing standard for business-grade web application development, which have been used widely as presentation layer. Lets see, how we can intergrate the ExtJs with Spring MVC.

You can download ExtJs from here - Download Extjs

In this example, we are going to populate the list of medicine name available in ExtJS DataGrid.

Below is the Medicine Business clas, Simple POJO. For this example forget about the dealers in the class.
public class Medicine extends BaseObject 
{ 
 private String company;
 private String code;
 private String description; 
 private Set dealers;

        //Relevant Setters and Getters

}

Since the JSON is the most popular way of providing input to ExtJs DataGrid, we are going define the DataStore first, which reads the data from the server through the HttpProxy call, and we use the JsonReader to read a server response that is sent back in JSON format

var store = new Ext.data.Store({
  proxy: new Ext.data.HttpProxy({
   url: '/getmedicine.htm'
  }),
  reader: new Ext.data.JsonReader({
   root:'medicineJson'
  },
  [{name: 'id'}, 
   {name: 'name'}, 
   {name: 'description'},
   {name: 'company'}
  ])
 }); 

And our controller, which return the relevant Medicine data in JSON Format. To return the output from the controller in JSON format, we will be using the classes net.sf api's. Make sure that you have the below jars files in your classpath

json-lib-2.4-jdk15.jar
json-lib-ext-spring-1.0.2.jar
ezmorph-0.8.1.jar

public class DataServiceController implements Controller
{
 private MedicineDao medicineDao;
 
 
 public MedicineDao getMedicineDao() {
  return medicineDao;
 }

 public void setMedicineDao(MedicineDao medicineDao) {
  this.medicineDao = medicineDao;
 }

 public ModelAndView handleRequest(HttpServletRequest request,
   HttpServletResponse response) throws Exception 
 {
  List medicineList = this.getMedicineDao().getAll();
  
  JsonConfig config = new JsonConfig();
  config.setExcludes(new String[] {"dealers" });
  config.setIgnoreDefaultExcludes(false);
  config.setCycleDetectionStrategy(CycleDetectionStrategy.LENIENT);
  
  //JSONObject obj = JSONObject.fromObject(medicineList, config);
  JSONArray obj = JSONArray.fromObject(medicineList, config);
  
  ModelMap modelMap = new ModelMap();
  //modelMap.addAttribute("medicineList" , obj);  
  //return new ModelAndView("jsonView", modelMap);
  modelMap.addAttribute("medicineJson", obj);
  //modelMap.addAttribute("medicineList" , medicineList);
  return new ModelAndView("jsonView", modelMap);
 }

}

Below is the entire content of medicinelist.js file defined in jsp, which includes the definition of the DataGrid.

Ext.onReady(function(){ 

 var store = new Ext.data.Store({
  proxy: new Ext.data.HttpProxy({
   url: '/getmedicine.htm'
  }),
  reader: new Ext.data.JsonReader({
   root:'medicineJson'
  },
  [{name: 'id'}, 
   {name: 'name'}, 
   {name: 'description'},
   {name: 'company'}
  ])
 }); 

 // row expander
  
    
    var gridBooks = new Ext.grid.GridPanel({
        store: store,
        width: 500,
        height: 500,        
        title: 'Medicine List',
        renderTo: 'medlist',
        cm: new Ext.grid.ColumnModel({
            defaults: {
                sortable: true
            },
            columns: [               
                {header: "Id", dataIndex: 'id'},
                {header: "Medicine Name", dataIndex: 'name'},
                {header: "Description", dataIndex: 'description'},
                {header: "Company" , dataIndex: 'company', renderer:renderCompany}
            ]
        }),       
        listeners: {
      rowClick: function(grid, rowI, event) {
       //alert("You Clicked Row " + rowI);
       //alert("Medicine Name" + grid.getStore().getAt(rowI).get('name'));
      }
     }
    });

    store.load();
});

Make sure that you have relevant extjs .js and .css file in your relevant, which can be downloaded from You can download ExtJs from here - Download Extjs


Happy programming ...!!!

Saturday, April 13, 2013

Spring Tiles Integration

Suppose if your web page has a standard header, footer and only center content will be changed, it is very difficult to hardcode in each and every webpage and if later if any changes is needed then all pages needs to be updated with the relevant details. Here comes Tiles which helps you to templatize the common items and include it in each and every page.

Lets see how we are going to integrate the Titles in our Spring MVC. Our application layout will have the standard header and footer across all web pages, where only the center content will be changed.

Make sure that you have the following jars files included in your lib

commons.beanutils.jar
commons-digester-2.1.jar
commons-logging-1.1.jar
tiles-api-2.0.4.jar
tiles-core-2.0.4.jar
tiles-jsp-2.0.4.jar

Configuring titles framework in Spring MVC


          /WEB-INF/tiles-def.xml


Using the definitions attribute, we need to specify the tiles definition file. The tiles-def.xml definitions are below, the file should be located under WEB-INF directory in your application. In the tiles-def.xml we need to define our base layout structure. The base layout we are building contatins the attributes title, header, body and footer. We need to create the baseLayout.jsp and place it under /WEB-INF/titles, the template baseLayout.jsp, will contain the different segments of a web page, header, body and footer.


BaseLayout.jsp - View Template
<%@ taglib uri="http://tiles.apache.org/tags-tiles" prefix="tiles"%>
..
..
<tiles:insertAttribute name="title" ignore="true"/>


..

To display the views, we use the ResourceBundleViewResolver. By default the view.properties will be used to store
the key value pairs

hello.(class)=org.springframework.web.servlet.view.tiles2.TilesView
hello.url=base

dealerlist.(class)=org.springframework.web.servlet.view.tiles2.TilesView
dealerlist.url=dealer

Controller File
ModelMap modelMap = new ModelMap();
modelMap.addAttribute("dealerList" , dealerList);		
return new ModelAndView("dealerlist", modelMap);

The base, delear in view.properties refers to the definition name in the tiles-def.xml file. The hello and dealerlist refers to the modelview name sent by your controller.

That's all you have integrated the Tiles with Spring MVC

Happy Programming...!!!

Thursday, April 4, 2013

Spring MVC - Bind an input field to a Date property

For request parameters representing string, number, and boolean values, the Spring MVC container can bind them to typed properties out of the box. Suppose you have the Date Input field, and the bean property is defined as Date Type, when container tries to bind it will throw exception

Failed to convert property value of type 'java.lang.String' to required type 'java.util.Date'

So we need to create a binding between your input field and your bean's Date property. Spring provides a PropertyEditor named CustomDateEditor which you can configure to convert an String to respective date format. You typically have to register it in a @InitBinder method of your controller

@InitBinder
public void initBinder(WebDataBinder binder)
{
    //binder.registerCustomEditor(ExpenseType.class, new ExpenseTypePropertyEditor());
    SimpleDateFormat dateFormat = new SimpleDateFormat("dd/MM/yyyy");
    dateFormat.setLenient(false);
    binder.registerCustomEditor(Date.class, new CustomDateEditor(dateFormat, true));
}

Happy Programming..!!!

Saturday, March 23, 2013

Eclipse Maven Build Fail - use -source 5 or higher to enable annotations

When you are using Maven package option in eclipse for generating a war file of a java web project which has the annotation in it,you will encounter the Build Fail error, below is the sample error which you will encounter, if the JRE and Annotation compiler wasn't configured properly in Eclipse
FAILED for project: 
    ExpenseReporting:ExpenseReporting:war:0.0.1-SNAPSHOT
Reason:
C:\Documents and Settings\MRamanujam\workspace\ExpenseReporting\src\main\java\com\expense\domain\Base.java:[9,2] annotations are not supported in -source 1.3
(use -source 5 or higher to enable annotations)
 @Id
To resolve the issue first you need to make sure that, Java compiler version you are using is greater than 5

javac -version

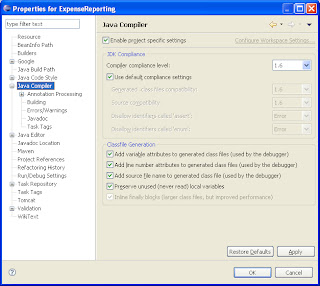
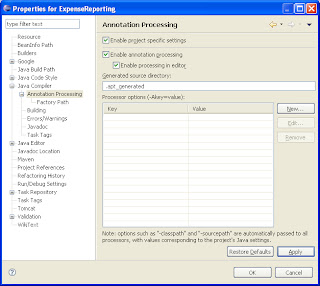
Next go to your project properties, select the Java Compiler in the tree menu.

Make sure the Compiler Compliance level is more than 1.5

Next click Annotation Processing and enable project specific settings, and apply the settings.


Then do the Maven package, your build will be successful, and the war wil be generated.

Happy Programming...!!!

Friday, March 1, 2013

Different ways of accessing a Zend View Helper

A Zend View Helper is simply a class, which follows a certain convention.When attached to a view object, you can call the helper as if it were a method of the view object itself. The View object retains helper instances,which means that they retain states between calls.
By convention we should use these view helpers in the View Layer only, but there are some circumstances we end up breaking this convention, start using these helpers in Controller, Helpers and Models. Lets see, how we can access the View Helpers from the differnt parts
//In Action Controller, you can access the view helper like below
$this->view->helpername();
or
$this->view->getHelper('helpername');

//In Action Helper, you can access the view helper like below
$view = $this->getActionController()->view;
$view->helpername();

//Suppose if you are in the Model, where you don't have any 
//reference to Zend, this is how you have to access
$viewObject = Zend_Controller_Action_HelperBroker::getStaticHelper('ViewRenderer')->view;
$viewObject->helpername();


Happy Programming ...!!!

Sunday, January 27, 2013

InvalidDataAccessApiUsageException: Write operations are not allowed in read-only mode

If you have enabled the filter OpenSessionInViewFilter, for fetching the lazily loaded data, you can typically see the below error message, when trying to do a persistence operation outside of Spring-managed transaction.

org.springframework.dao.InvalidDataAccessApiUsageException: Write operations are not allowed in read-only mode (FlushMode.NEVER/MANUAL): Turn your Session into FlushMode.COMMIT/AUTO or remove 'readOnly' marker from transaction definition.
org.springframework.orm.hibernate3.HibernateTemplate.checkWriteOperationAllowed(HibernateTemplate.java:1186)
org.springframework.orm.hibernate3.HibernateTemplate$12.doInHibernate(HibernateTemplate.java:696)
org.springframework.orm.hibernate3.HibernateTemplate.doExecute(HibernateTemplate.java:419)
org.springframework.orm.hibernate3.HibernateTemplate.executeWithNativeSession(HibernateTemplate.java:374)
org.springframework.orm.hibernate3.HibernateTemplate.save(HibernateTemplate.java:694)

OpenSessionInViewFilter has an alternative "deferred close mode", to resolve the issue. This can be activated through setting the singleSession=false. This will use one Session per transaction, but keep each of those open until view rendering has been completed. As no Session will be reused for another transaction in this case, there is no risk of accidentally flushing inconsistent state


  OpenSessionInViewFilter
  org.springframework.orm.hibernate3.support.OpenSessionInViewFilter
  
     singleSession     false  


Happy Programming !!!