Any component is essentially a piece of reusable code that behaves in a particular way. JSF 2 composite tag library facilitate you to create reusable components Facelets from the existing components. In this tutorial we will learn, how to create a simple composite component (registerComp.xhtml), a user registration form, which comprises name and email fields and a submit to button to process the action.
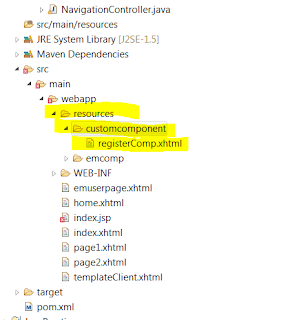
A composite component is a Facelet that resides in a resource library. So the component you are going to create must reside under the resource folder. Let's say if you are going to put the components under the folder named customcomponent. The Directory structure of your project will look like this below. Here the folder name resource is a must, except the resource folder name, all other folders and file names are user defined.
Now we will see, what are the contents, we need to place in our registerComp.xhtml, which we have created.
1) First we need to define the Composite Namespace in the html header as shown below
2) Next Composite Tags. Below are the some of the tags available, but we will be using the composite:interface, composite:attribute and composite:implementation for our simple example.
Now we have created the component, make sure that it resides in the resource folder.
3) Now let's see how to define this component for usage. Use the Custom Namespace
xmlns:customcomponent="http://java.sun.com/jsf/composite/customcomponent"
The first part defines that the namespace for the composite component is "customcomponent", and the second part declares where in the resources folder to find the definition of this composite component. In this example its in the "customcomponent" subfolder inside resources.
4) Now let's how to use and pass values to the Component
This is how you use the tag: namespace:FileName; in our example customcomponent:registerComp, registerComp is the name of the file, so by default its the tag name;
Above, we have passed the hard coded values to the userName and email and binded the submit to userAction in a managed bean named register
That's all we have created a new Composite Component. Now when you call the page, which has the defined composite component, you will see the form, which has username and email value hardcoded, and a submit button.
Happy Programming...!!!
A composite component is a Facelet that resides in a resource library. So the component you are going to create must reside under the resource folder. Let's say if you are going to put the components under the folder named customcomponent. The Directory structure of your project will look like this below. Here the folder name resource is a must, except the resource folder name, all other folders and file names are user defined.

Now we will see, what are the contents, we need to place in our registerComp.xhtml, which we have created.
1) First we need to define the Composite Namespace in the html header as shown below
 <html xmlns="http://www.w3.org/1999/xhtml"
    xmlns:h="http://java.sun.com/jsf/html"
    xmlns:f="http://java.sun.com/jsf/core"
    xmlns:composite="http://java.sun.com/jsf/composite"
    >
 ...
 </html>
2) Next Composite Tags. Below are the some of the tags available, but we will be using the composite:interface, composite:attribute and composite:implementation for our simple example.
| Tag | Description |
| composite:interface | Declares the usage contract for a composite component. The composite component can be used as a single component whose feature set is the union of the features declared in the usage contract. Within the |
| composite:implementation | Defines the implementation of the composite component. If a composite:interface element appears, there must be a corresponding composite:implementation. It is used for implementing the composite components declared in the composite:interface. To access the component interface attributes an expression #{cc.attrs.attribute_name} is used (cc is a reserved keyword in JSF). |
| composite:attribute | Declares an attribute that may be given to an instance of the composite component in which this tag is declared. This tag can be used inside the |
| composite:insertChildren | Any child components or template text within the composite component tag in the using page will be reparented into the composite component at the point indicated by this tag’s placement within the composite:implementation section. |
| composite:valueHolder | Declares that the composite component whose contract is declared by the composite:interface in which this element is nested exposes an implementation of javax.faces.component.ValueHolder suitable for use as the target of attached objects in the using page. |
| composite:editableValueHolder | Declares that the composite component whose contract is declared by the composite:interface in which this element is nested exposes an implementation of javax.faces.component.EditableValueHolder suitable for use as the target of attached objects in the using page. |
 <?xml version="1.0" encoding="UTF-8"?>
 <!DOCTYPE html PUBLIC "-//W3C//DTD XHTML 1.0 Transitional//EN"
 "http://www.w3.org/TR/xhtml1/DTD/xhtml1-transitional.dtd">
 <html xmlns="http://www.w3.org/1999/xhtml"
    xmlns:h="http://java.sun.com/jsf/html"
    xmlns:f="http://java.sun.com/jsf/core"
    xmlns:composite="http://java.sun.com/jsf/composite"
    >
   <!-- INTERFACE -->
   <composite:interface>
        <composite:attribute name="userNameLable" />
        <composite:attribute name="userNameValue" />
        <composite:attribute name="emailLable" />
        <composite:attribute name="emailValue" />
        <composite:attribute name="registerButtonText" />
        <composite:attribute name="registerButtonAction"
             method-signature="java.lang.String action()" />
   </composite:interface>
   <!-- IMPLEMENTATION -->
   <composite:implementation>
      <h:form>
           <h:panelGrid columns="2" id="textPanel">
                #{cc.attrs.userNameLable} :
                <h:inputText id="userName" value="#{cc.attrs.userNameValue}" />
                #{cc.attrs.emailLable} :
                <h:inputText id="email" value="#{cc.attrs.emailValue}" />
           </h:panelGrid>
           <h:commandButton action="#{cc.attrs.registerButtonAction}"
                value="#{cc.attrs.registerButtonText}"
           />
      </h:form>
   </composite:implementation>
 </html>
Now we have created the component, make sure that it resides in the resource folder.
3) Now let's see how to define this component for usage. Use the Custom Namespace
 <html xmlns="http://www.w3.org/1999/xhtml"
   xmlns:h="http://java.sun.com/jsf/html"
   xmlns:ui="http://java.sun.com/jsf/facelets">
   xmlns:customcomponent="http://java.sun.com/jsf/composite/customcomponent">
xmlns:customcomponent="http://java.sun.com/jsf/composite/customcomponent"
The first part defines that the namespace for the composite component is "customcomponent", and the second part declares where in the resources folder to find the definition of this composite component. In this example its in the "customcomponent" subfolder inside resources.
4) Now let's how to use and pass values to the Component
This is how you use the tag: namespace:FileName; in our example customcomponent:registerComp, registerComp is the name of the file, so by default its the tag name;
 <customcomponent:registerComp
           userNameLable="Name"
           userNameValue="Ramanujam"
           emailLable="E-mail"
           emailValue="reachram_ramesh@hotmail.com"
           registerButtonText="Register"
           registerButtonAction="#{register.userAction}"
       />
Above, we have passed the hard coded values to the userName and email and binded the submit to userAction in a managed bean named register
That's all we have created a new Composite Component. Now when you call the page, which has the defined composite component, you will see the form, which has username and email value hardcoded, and a submit button.
Happy Programming...!!!
