Tuesday, May 28, 2013

First step into Scala Framework

I have been recently moved to a new project, which is using Scala Framework. It seems to be an new word to me first, when i heard about the framework which we are going to use. So i have started digging into deep, to understand the real usage of the framework. So here's my record so I don't forget in future what i have learnt and how i did it.

Scala is a Functional/Object-Oriented and scripting language that exectues on Java Virtual Machine (JVM) and is becoming popular now, especially with the JAVA developers. It cleans up what are often considered to have been poor design decisions in Java (e.g. type erasure, checked exceptions, the non-unified type system) and adds a number of other features designed to allow cleaner, more concise and more expressive code to be written.

You can download Scala from here. If you have downloaded the .msi file, just double click it, it will do everything for you, if you have downloaded the zip file, extract it and put it in a location, and set the environment variable SCALA_HOME point to the bin directory of the scala folder. Once you did the above, just go to the command prompt, and type scala, you will enter into the scala prompt as below.


Once you are in scala prompt just type 8 * 5, your screen should be like this, once you typed just press enter

scala> 8 * 5

it will return res0: Int = 40

res0 is result index 0, Int is the type of output, 40 is the result. Suppose if you want to use the output for further processing, you have to just say

scala> res0 * 2

It will return res1: Int = 80

res1 is result index 1, Int is the type of output, 80 is the result.

Nice one right, seems to that it limits the number of lines we need to code to get the result :)

In the coming weeks, you can see some more examples on Scala, as and then, when i learn new things on this.

Happy programming ...!!!

Friday, May 24, 2013

Spring MVC Form Validation with Annotation using Spring Bean Validation Framework

This tutorial walks you through the step by step instructions in order to support and apply validation example in Spring MVC, using Spring Bean Validation Framework, which is part of the Spring Modules project.

So here's my record so I don't forget in future how I did it.

Make sure that you have downloaded the spring-modules-validation-0.8.jar have it in your classpath.

Spring Modules validation provides a bunch of generic validation out of the box for all the tedious, standard stuff - length validation, mandatory fields, valid e-mail addresses etc (details here). And you can plug this straight into your application by using annotations. How? Easy.

Below is the configuration, you have to do in your servlet xml file, where you are defining your validator.


Below is my simple Entity Model class, which deals with product. Since the Name and Description of the Product is a must while presisting the data, i have added an validation constraint through annotation, here you can see i have added @NotBlank for name and description variables, and also the message to be shown to the users when they left it blank.

public class Product{
 
    @Id
    @Column(name="ID")
    @GeneratedValue
 private int id;
 
 @NotBlank(message = "Name should not be empty")
 @Column(name="NAME")
 private String name;
 
 @NotBlank(message = "Description should not be empty")
 @Column(name="DESCRIPTION")
 private String description;
 
 public int getId() {
  return id;
 }
....

Now the Spring Controller
The Bean Validation Framework includes its own Validator implementation, called BeanValidator, we are injecting this into the controller, and it was autowired through the xml configuration which we did in the top.

On submitting the form, we will be routed to the addExpense method, where will call the validate() method by passing in the form bean (expense) and the BindingResult. If there any errors, we will just return the form view name which will show the error message.

@Controller
public class ExpenseController 
{
 @Autowired
 private ExpenseService expenseService;
 @Autowired
 private ExpenseTypeService expenseTypeService; 
 @Autowired
    private Validator validator;
    
    public void setValidator(Validator validator) {
        this.validator = validator;
    }
 
 @RequestMapping("/expenselist")
 public String expenselist(Map map, @ModelAttribute("ExpenseName") String expenseName)
 {
  List expenseTypeList = expenseTypeService.fetchAll();
  
  map.put("expense", new Expense()); 
  map.put("expenseTypeList", expenseTypeList);
  map.put("expenseList", expenseService.fetchAll()); 
  map.put("expenseName", expenseName);
  return "expenselist";
 }
 
 @RequestMapping(value="/addexpense", method=RequestMethod.POST)
 public String addExpense(@ModelAttribute("expense") 
   Expense expense, BindingResult result, RedirectAttributes redirectAttrs)
 {
  validator.validate(expense, result);
  if (result.hasErrors()) { return "expenselist"; }
  
  //System.out.println(expense.getExpenseTypeId());
  System.out.println(expense.getName());
  expenseService.add(expense);
  redirectAttrs.addFlashAttribute("ExpenseName", expense.getName());
  return "redirect:/expenselist.html";
 }
}

Suppose if you are not Injecting the Validator, you can just initilize the valiator as shown below in the controller, rest are same as above
public class ExpenseController 
{
 @Autowired
 private ExpenseService expenseService;
 @Autowired
 private ExpenseTypeService expenseTypeService;

        private BeanValidator beanValidator = new BeanValidator(new AnnotationBeanValidationConfigurationLoader());

}

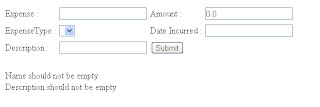
Below is the screen shot, with the error message shown, when the form is submitted.


The tag form:errors will help us to show the error message to the users

Expense :


Amount :


ExpenseType :


Date Incurred :


Description :


Happy programming.

Saturday, May 11, 2013

Spring MVC - FlashAttributes

One of the common problem in a web based application, involving form submission is mutilple form submission, re-entering submitting the form on browser refresh, pop-up alert asking for re-submission of the form, if we press the back button. To overcome the above problem, we will be doing a redirect after a form submission instead of the forward. Doing a redirect causes the browser to do a new GET request and load the page, and provides a solution to the above mentioned problem, but comes with one serious problem, where we will be missing the vital data of request parameters and attributes.

To overcome this problem, Spring MVC comes with FlasAttributes. Flash attributes provide a way for one request to store attributes intended for use in another. This is most commonly needed when redirecting — for example, the Post/Redirect/Get pattern. Flash attributes are saved temporarily before the redirect (typically in the session) to be made available to the request after the redirect and removed immediately.

Spring MVC has two main abstractions in support of flash attributes. FlashMap is used to hold flash attributes while FlashMapManager is used to store, retrieve, and manage FlashMap instances.

Flash attribute support is always "on" and does not need to enabled explicitly although if not used, it never causes HTTP session creation. On each request there is an "input" FlashMap with attributes passed from a previous request (if any) and an "output" FlashMap with attributes to save for a subsequent request. Both FlashMap instances are accessible from anywhere in Spring MVC through static methods in RequestContextUtils.

Here in the below sample code, we are adding the expense details to the DB and redirecting back to the form, with the message saying the following expense have been added to the list.


Flash attributes added via RedirectAttributes are automatically propagated to the "output" FlashMap. Here we have added RedirectAttributes redirectAttrs to your Spring controller’s method addExpense. The addFlashAttribute method automatically add the given parameter to the output flash map and pass it to the subsequent requests.

Before your handler method will be called, Spring Framework will populate the Model with the available Flash Attributes – at this point value passed from addExpense will become a model attribute for the expenselist method, and the same can be added to the map, to return it to the presentation layer, to get it displayed. Here the from the redirect,it comes to the expenselist method, where it will reach as a ModelAttribute and the same have been defined in the method signature with the respective type.

@RequestMapping("/expenselist")
public String expenselist(Map map, @ModelAttribute("ExpenseName") String expenseName)
{
 List expenseTypeList = expenseTypeService.fetchAll();
 
 map.put("expense", new Expense()); 
 map.put("expenseTypeList", expenseTypeList);
 map.put("expenseList", expenseService.fetchAll()); 
 map.put("expenseName", expenseName);
 return "expenselist";
}

@RequestMapping(value="/addexpense", method=RequestMethod.POST)
public String addExpense(@ModelAttribute("expense") 
  Expense expense, BindingResult result, RedirectAttributes redirectAttrs)
{
 //System.out.println(expense.getExpenseTypeId());
 //System.out.println(expense.getName());
 expenseService.add(expense);
 redirectAttrs.addFlashAttribute("ExpenseName", expense.getName());
 return "redirect:/expenselist.html";
}

Happy Programming...!!!

Saturday, May 4, 2013

Integrate ExtJs DataGrid with Spring MVC

Sencha ExtJs is one of the rapidly growing standard for business-grade web application development, which have been used widely as presentation layer. Lets see, how we can intergrate the ExtJs with Spring MVC.

You can download ExtJs from here - Download Extjs

In this example, we are going to populate the list of medicine name available in ExtJS DataGrid.

Below is the Medicine Business clas, Simple POJO. For this example forget about the dealers in the class.
public class Medicine extends BaseObject 
{ 
 private String company;
 private String code;
 private String description; 
 private Set dealers;

        //Relevant Setters and Getters

}

Since the JSON is the most popular way of providing input to ExtJs DataGrid, we are going define the DataStore first, which reads the data from the server through the HttpProxy call, and we use the JsonReader to read a server response that is sent back in JSON format

var store = new Ext.data.Store({
  proxy: new Ext.data.HttpProxy({
   url: '/getmedicine.htm'
  }),
  reader: new Ext.data.JsonReader({
   root:'medicineJson'
  },
  [{name: 'id'}, 
   {name: 'name'}, 
   {name: 'description'},
   {name: 'company'}
  ])
 }); 

And our controller, which return the relevant Medicine data in JSON Format. To return the output from the controller in JSON format, we will be using the classes net.sf api's. Make sure that you have the below jars files in your classpath

json-lib-2.4-jdk15.jar
json-lib-ext-spring-1.0.2.jar
ezmorph-0.8.1.jar

public class DataServiceController implements Controller
{
 private MedicineDao medicineDao;
 
 
 public MedicineDao getMedicineDao() {
  return medicineDao;
 }

 public void setMedicineDao(MedicineDao medicineDao) {
  this.medicineDao = medicineDao;
 }

 public ModelAndView handleRequest(HttpServletRequest request,
   HttpServletResponse response) throws Exception 
 {
  List medicineList = this.getMedicineDao().getAll();
  
  JsonConfig config = new JsonConfig();
  config.setExcludes(new String[] {"dealers" });
  config.setIgnoreDefaultExcludes(false);
  config.setCycleDetectionStrategy(CycleDetectionStrategy.LENIENT);
  
  //JSONObject obj = JSONObject.fromObject(medicineList, config);
  JSONArray obj = JSONArray.fromObject(medicineList, config);
  
  ModelMap modelMap = new ModelMap();
  //modelMap.addAttribute("medicineList" , obj);  
  //return new ModelAndView("jsonView", modelMap);
  modelMap.addAttribute("medicineJson", obj);
  //modelMap.addAttribute("medicineList" , medicineList);
  return new ModelAndView("jsonView", modelMap);
 }

}

Below is the entire content of medicinelist.js file defined in jsp, which includes the definition of the DataGrid.

Ext.onReady(function(){ 

 var store = new Ext.data.Store({
  proxy: new Ext.data.HttpProxy({
   url: '/getmedicine.htm'
  }),
  reader: new Ext.data.JsonReader({
   root:'medicineJson'
  },
  [{name: 'id'}, 
   {name: 'name'}, 
   {name: 'description'},
   {name: 'company'}
  ])
 }); 

 // row expander
  
    
    var gridBooks = new Ext.grid.GridPanel({
        store: store,
        width: 500,
        height: 500,        
        title: 'Medicine List',
        renderTo: 'medlist',
        cm: new Ext.grid.ColumnModel({
            defaults: {
                sortable: true
            },
            columns: [               
                {header: "Id", dataIndex: 'id'},
                {header: "Medicine Name", dataIndex: 'name'},
                {header: "Description", dataIndex: 'description'},
                {header: "Company" , dataIndex: 'company', renderer:renderCompany}
            ]
        }),       
        listeners: {
      rowClick: function(grid, rowI, event) {
       //alert("You Clicked Row " + rowI);
       //alert("Medicine Name" + grid.getStore().getAt(rowI).get('name'));
      }
     }
    });

    store.load();
});

Make sure that you have relevant extjs .js and .css file in your relevant, which can be downloaded from You can download ExtJs from here - Download Extjs


Happy programming ...!!!